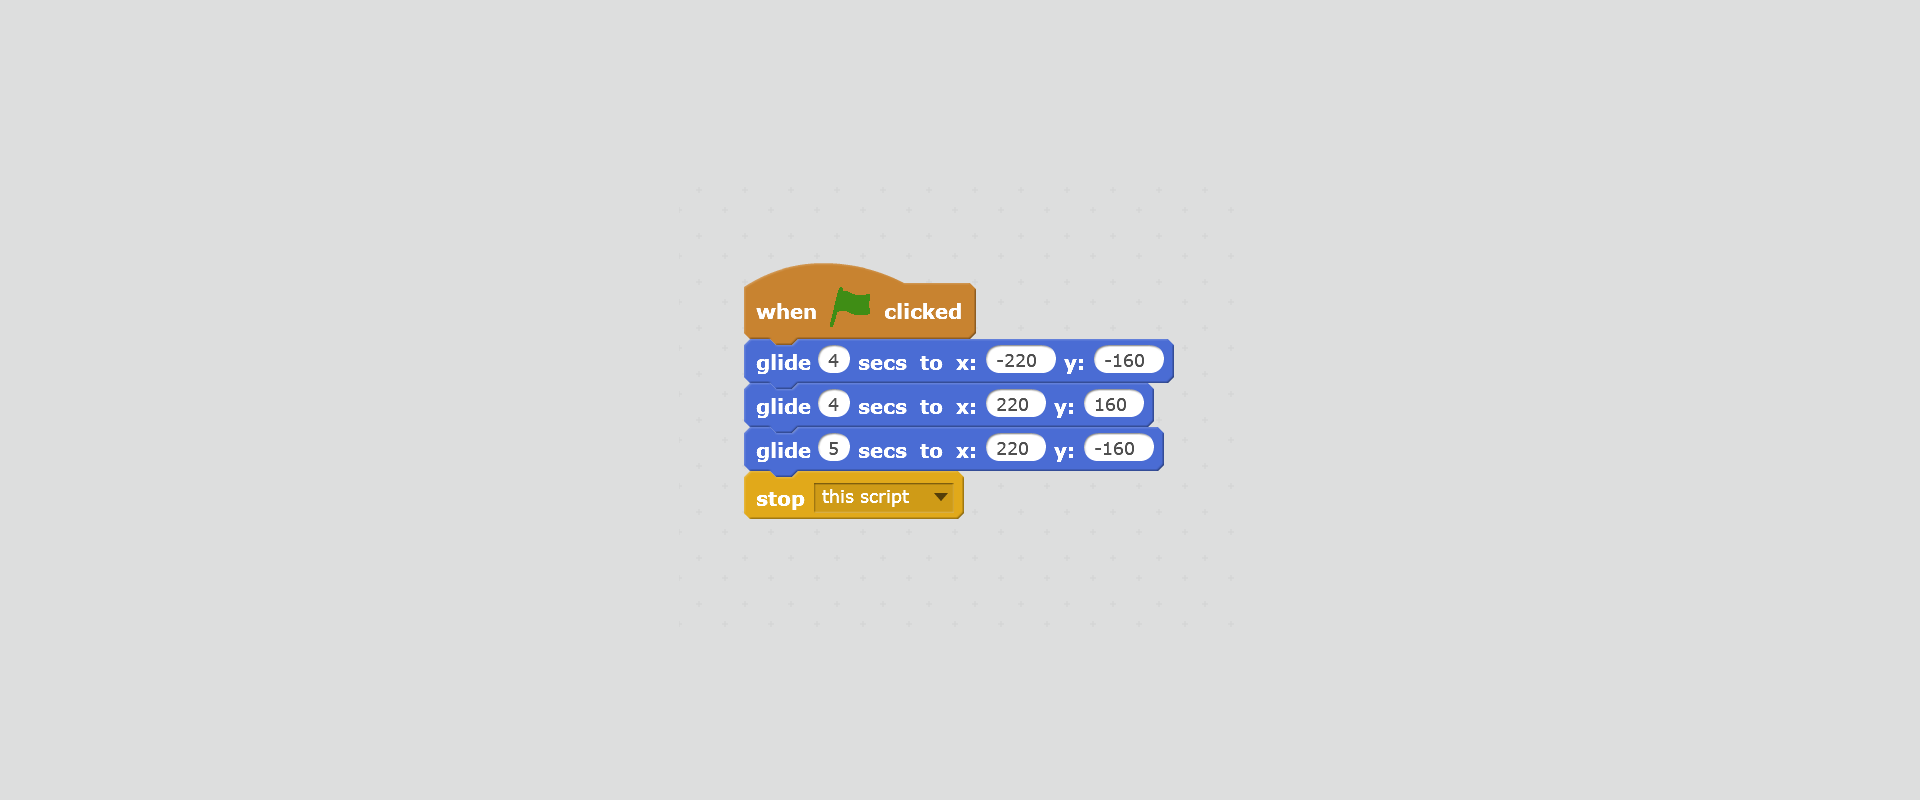
Enter the following short code and observe how the sprite moves.
Explain what x and y mean in the entered commands.
RaYV6B7jUKjuO1
Na ilustracji przedstawiony jest skrypt zawierający sekwencję poleceń, które umożliwiają duszkowi przemieszczanie się ślizgiem do zadanych pozycji. Od góry bloczki: when 'zielona flaga' clicked; glide 4 secs to x: minus 220, y:minus 160; glide 4 secs to x: 220, y: 160; glide 5 secs to x: 220, y:minus 160; stop this script.
Your task is to create an animation in which the sprite will cross the roadroadroad when the traffic lighttraffic lighttraffic light turns green.
To create such animation, it is useful to know how to determine the positionpositionposition of the sprite accurately and to create scripts in which, after meeting certain conditions, the sprite performs actions that we planned for it. In this case, the sprite‑cat will cross the road after the traffic light turns green.
The stage in Scratch is described by coordinatescoordinatescoordinates; therefore each element on the stage is assigned a pair of numbers or coordinates.
You can see them in the bottom right corner of the stage - when you move the mouse pointer on the stage, its current position is displayed. The horizontal position is x and the vertical position is y.
The size of the stage on which the sprite moves is fixed: the width is 480 points, and the height is 360 points.
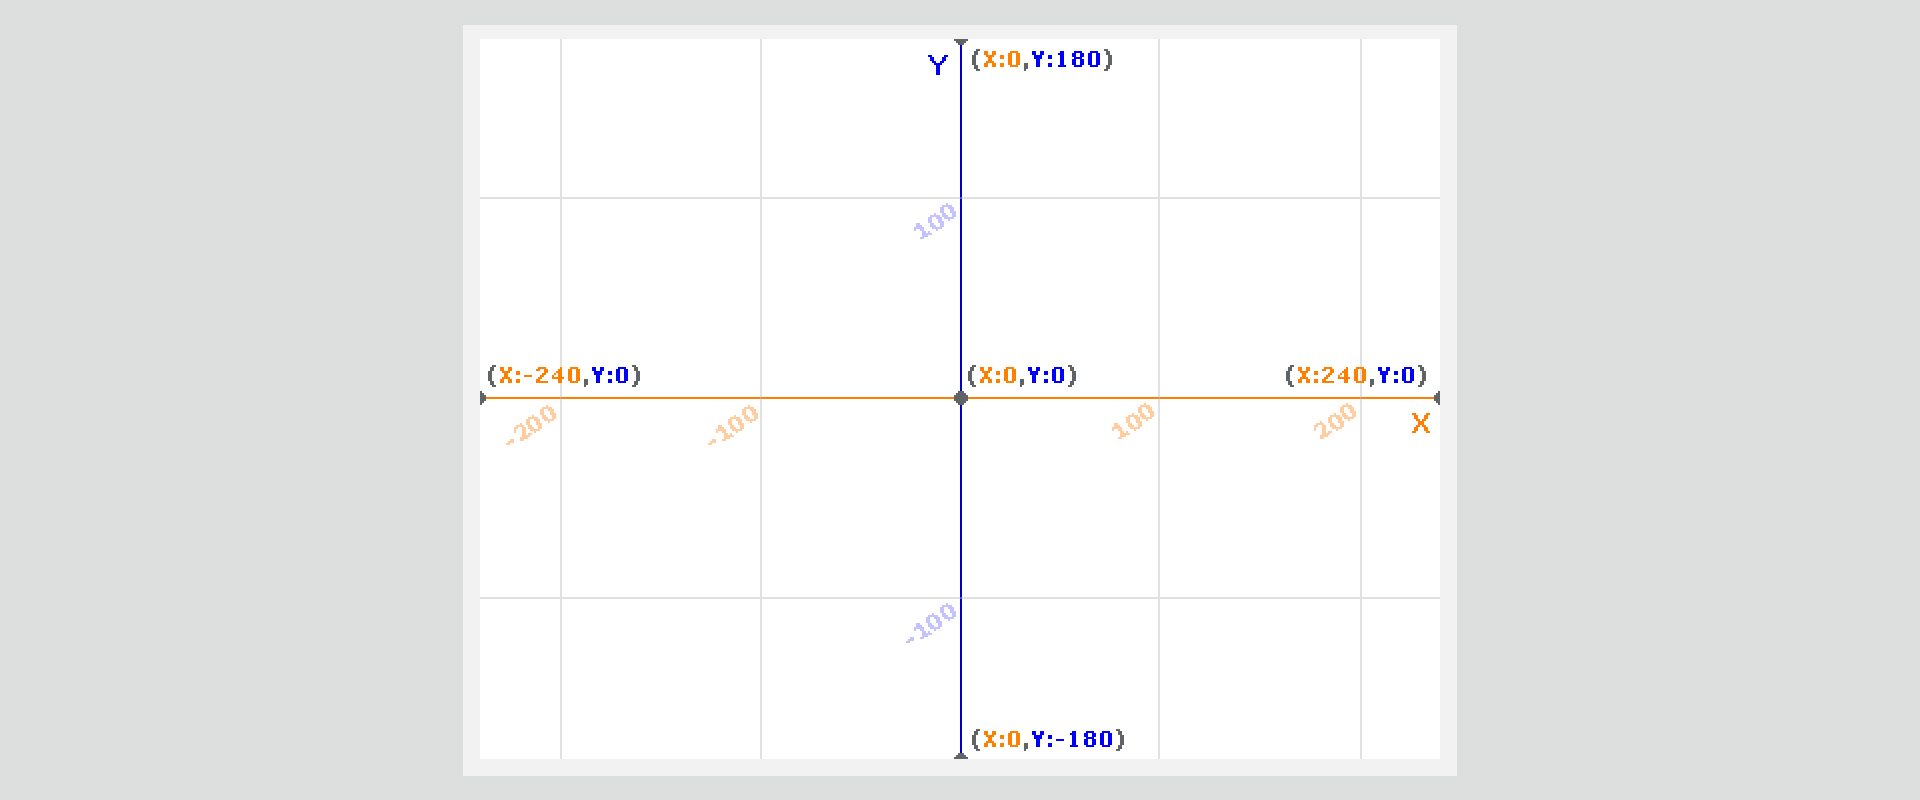
Useful for the design of various scripts is the xy‑grid backdrop, which you can download from the Backdrop Library. It facilitates the placement of various elements, according to our ideas.
RycqCS4E2UrFe1
Na ilustracji przedstawione jest tło z programu Scratch z biblioteki teł, zawierające układ współrzędnych dopasowany do wymiarów sceny. Narysowana jest pozioma oś X, z podziałką co 100, z zaznaczonymi punktami: X równym minus 240, Y równym 0 oraz X równym 240, Y równym 0. Narysowana jest pionowa oś Y, z podziałką co 100, z zaznaczonymi punktami: X równym 0, Y równym minus 180 oraz X 0, Y równym 180. Pod wykresem widoczna jest siatka.
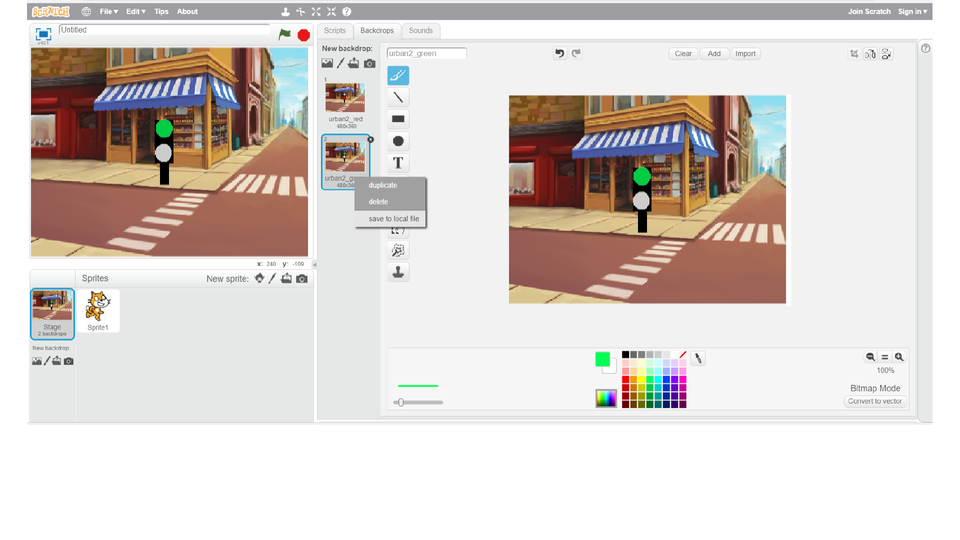
Animation with the sprite crossing the roadroadroad can be carried out in many ways. In this example, you'll see how you can use the backdrop to create a traffic light that changes the colours of lights from green to red.
To create a traffic light standing at the pedestrian crossingpedestrian crossingpedestrian crossing, the Urban2 backdrop from the Backdrop Library was used. In the Scratch graphic editor, the traffic light was added. The changed backdrop was duplicated. On one copy a green colour was added to the traffic light, on the second - red. These backdrops will then be used in animation.
What was the effect of these changes you can see on the slideshow.
RxMJoYyLUstPK1
Pokaz przedstawia jak w programie Scratch dodać światła uliczne do tła. Instrukcja obsługi z poziomu klawiatury: 1. Uruchomienie aplikacji - ENTER, 2. Na każdym ze slajdów czytany jest automatycznie tekst alternatywny po polsku, 3. Przy pierwszym uruchomieniu na pierwszym slajdzie, czytanie tekstu po angielsku - TAB, 4. Przejście między slajdami: do następnego slajdu - TAB, do poprzedniego slajdu - TAB + SHIFT, 5. Przejście do czytania napisu po angielsku - strzałka w górę + strzałka w dół (czyta tekst po angielsku widoczny na slajdzie).
Pokaz przedstawia jak w programie Scratch dodać światła uliczne do tła. Instrukcja obsługi z poziomu klawiatury: 1. Uruchomienie aplikacji - ENTER, 2. Na każdym ze slajdów czytany jest automatycznie tekst alternatywny po polsku, 3. Przy pierwszym uruchomieniu na pierwszym slajdzie, czytanie tekstu po angielsku - TAB, 4. Przejście między slajdami: do następnego slajdu - TAB, do poprzedniego slajdu - TAB + SHIFT, 5. Przejście do czytania napisu po angielsku - strzałka w górę + strzałka w dół (czyta tekst po angielsku widoczny na slajdzie).
Make your own boards with the traffic lighttraffic lighttraffic light. You can use a ready backdrop from the Backdrop Library or do it yourself from scratch in any graphic program.
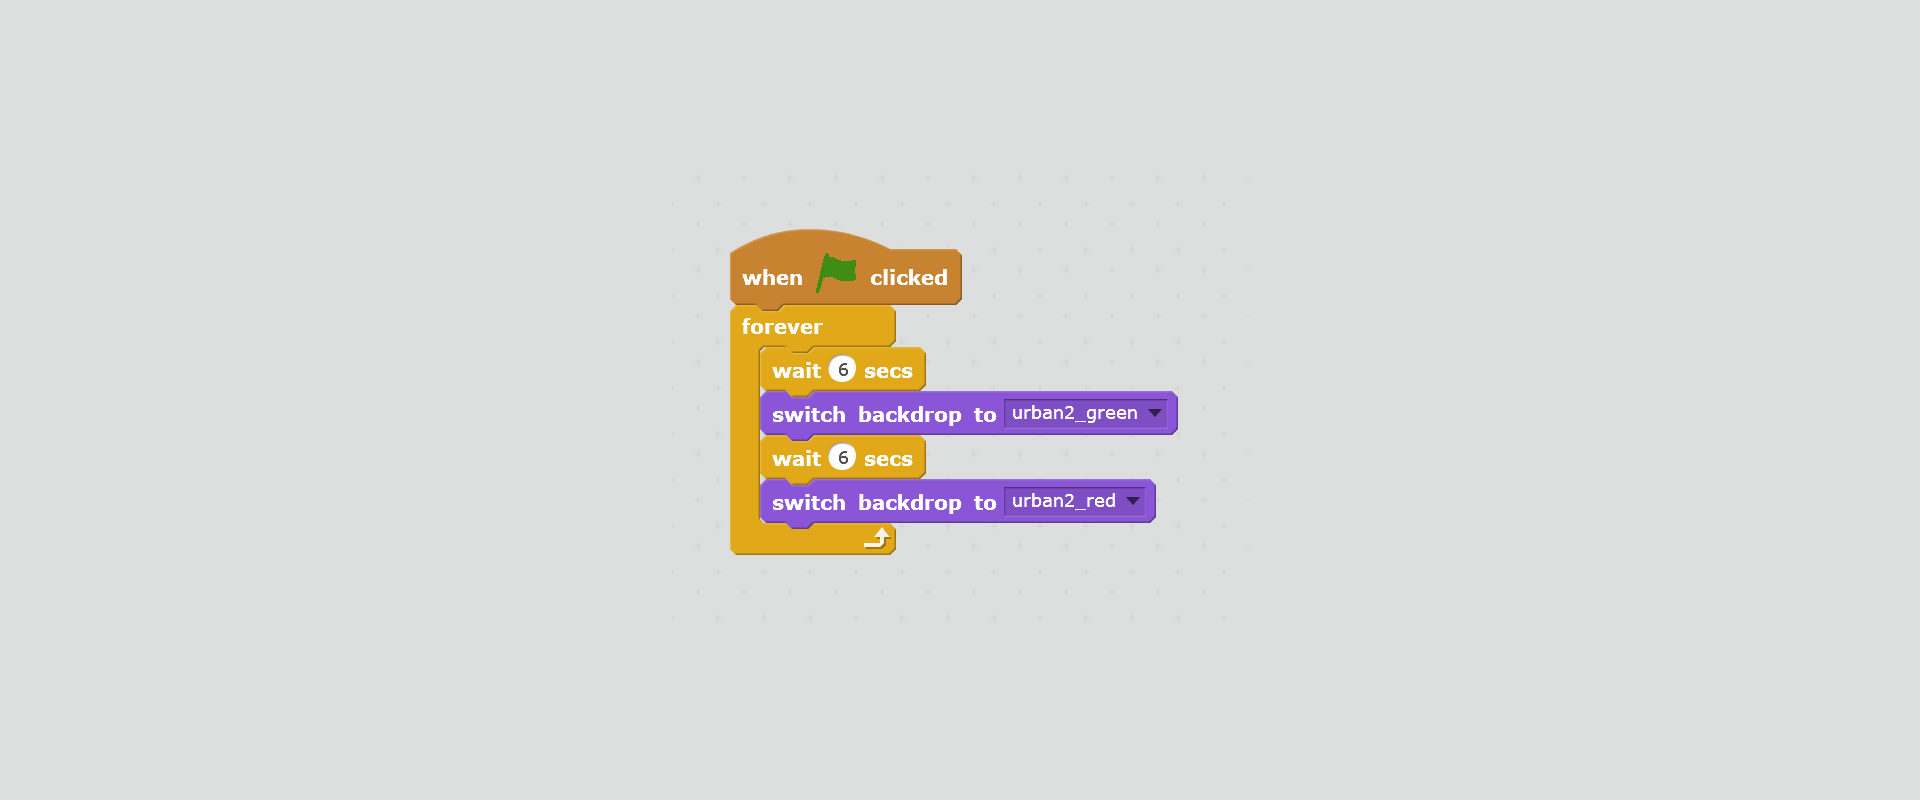
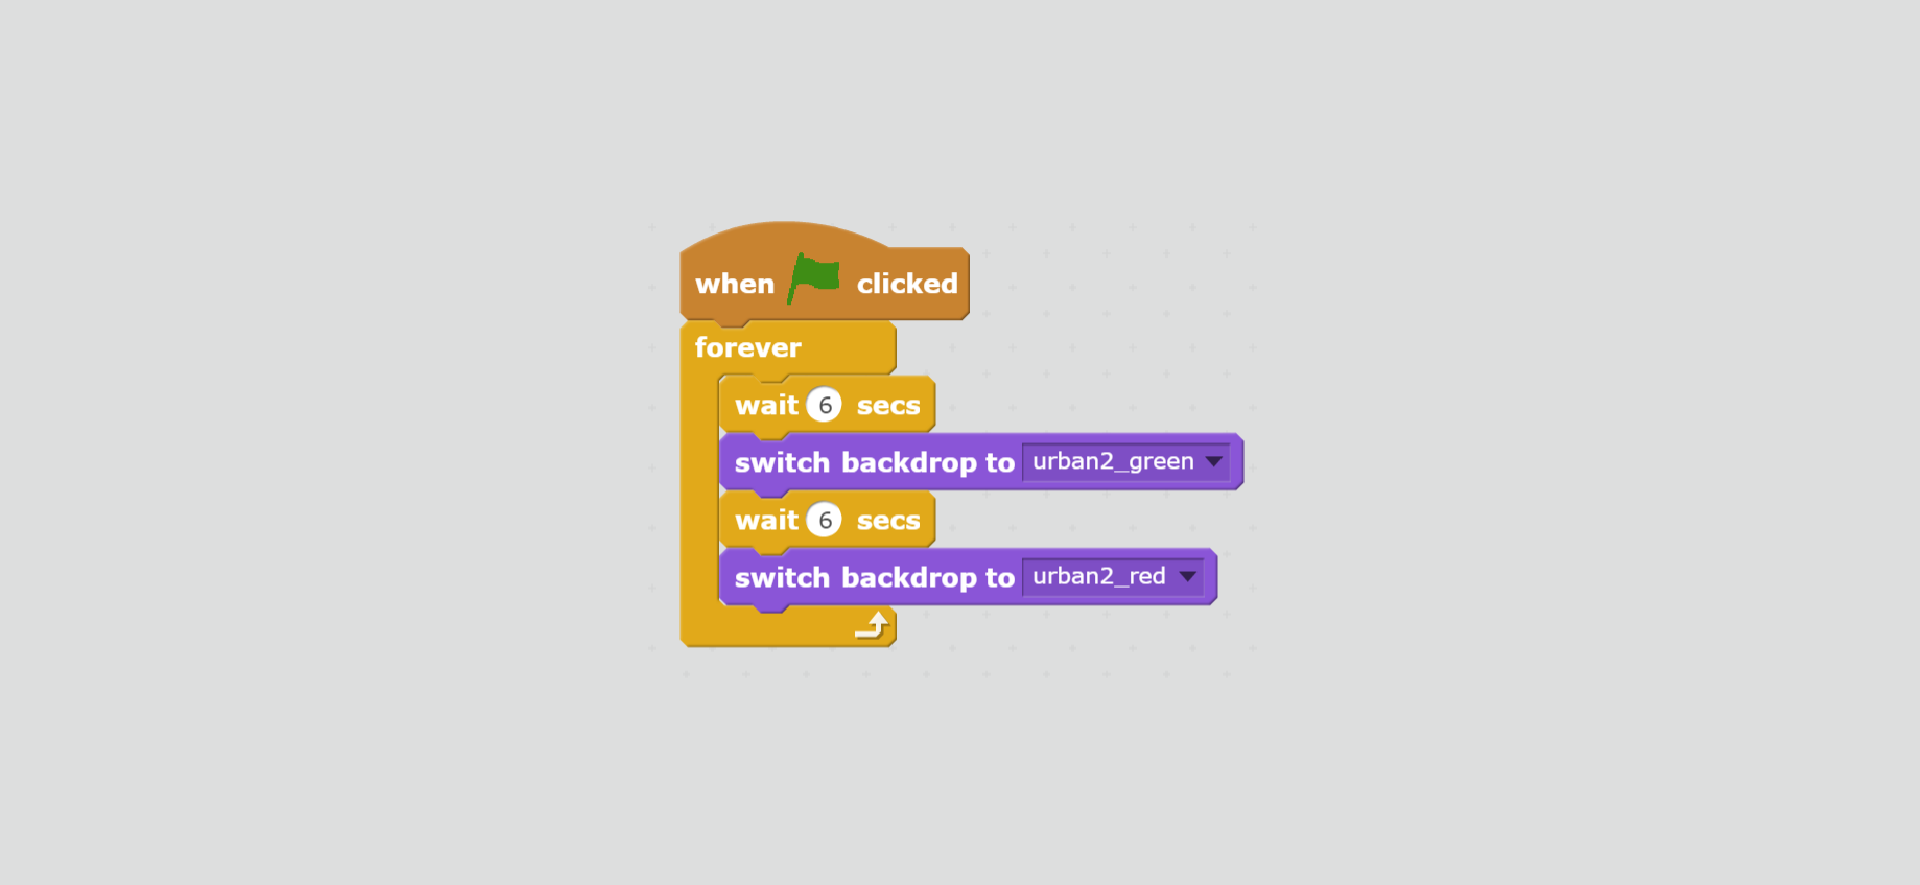
You already have ready boards with a traffic light. Create a script that will change the lights within a specified time interval. Switch on the green light first, and after 6 seconds it will turn red. The script should be started with the green flag button. The lights are changing until the script is switched off using the red button.
Solution
R1RyqNcWKDc9z1
Na ilustracji przedstawiony jest zrzut ekranu przedstawiający skrypt zawierający sekwencję poleceń, które umożliwiają cykliczną zamianę dwóch teł o podanych nazwach: urban2_green i urban2_red. Od góry bloczki: when 'zielona flaga' clicked; forever; wait 6 secs; switch backdrop to urban2_green; wait 6 secs; switch backdrop to urban2_red; end forever.
You already have a crossing where the traffic lights work. Let's agree that one traffic light will serve the whole crossing for the time being.
Build a script that will place the sprite in front of the pedestrian crossingpedestrian crossingpedestrian crossing. The sprite task is to go through the first and the second pedestrian crossing. At this stage, do not worry if the sprite passes red or green light.
Solution
RsuzTfpiCczgw1
Na ilustracji przedstawiony jest zrzut ekranu przedstawiający skrypt zawierający sekwencję poleceń, które umożliwiają duszkowi przemieszczenie się przez przejście dla pieszych. Od góry bloczki: when 'zielona flaga' clicked; show; go to x: minus 150, y: minus 150; point in direction 90; turn 40 degrees; repeat 25; move 10 steps; next costume; wait 0,2 secs; end repeat; point in direction 90; repeat 25; move 10 steps; next costume; wait 0,2 secs; end repeat; hide; stop this script.
To place the sprite in front of the pedestrian crossing, you need to find the coordinatescoordinatescoordinates of the point at which the sprite will start moving. Let the sprite always start from the same positionpositionposition (e.g. let it look right).
Then turn the sprite in the direction of the passage. After crossing the sprite should turn again towards the next passage.
Sometimes it happens that we want to repeat a series of commands in the script. Every change you want to make requires careful addition of information in many places. This can be avoided by creating a new variable where we will change the settingssettingssettings only once.
To create a new variable, in the More Blocks category, click on the Make a Block button. Give it a name. Then we attach other blocks to it, which we usually use in several places. In the old script, in place of the removed blocks insert a new block that contains all the commands.
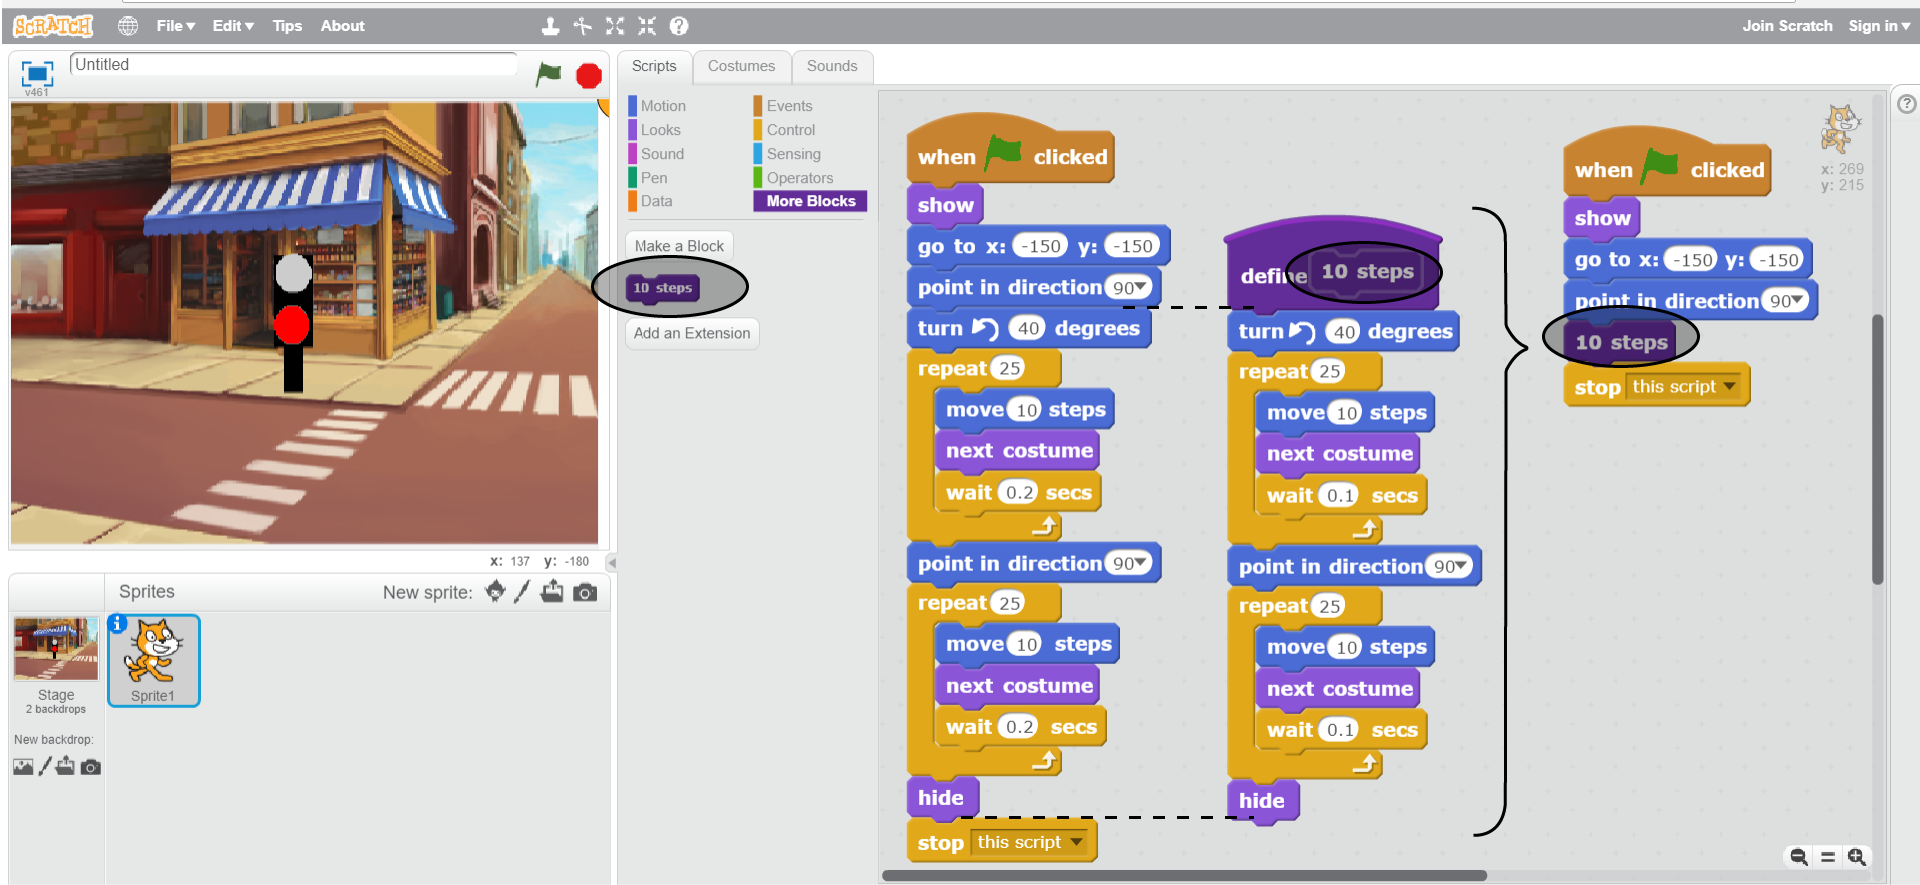
Take a look at the drawing below. It shows how we can create a new block.
RaR4x6bSabRWs1
Na ilustracji przedstawiony jest zrzut ekranu, na którym widoczne są wszystkie okna programu Scratch. Na górze pasek menu z logo, ikoną umożliwiającą zmianę języka, File, Edit, Tips, About. Na środku paska znajdują się ikony narzędzi: stempel, nożyce, pomniejszenie, powiększenie, pomoc. Poniżej po lewej okno podglądu. W nim na środku widoczny jest sygnalizator z białym światłem na górze, czerwonym na dole, stojący przy przejściu dla pieszych na skrzyżowaniu. W tle budynki z wystawami sklepów i ulice. Na górze okna po lewej ikona sceny, obok napis Untitled po prawej stronie ikona flaga oznaczająca play, ikona ośmiokąt oznaczająca stop. Na dole okna po prawej znaczniki położenia duszka na scenie x i y. Pod oknem podglądu znajduje się okno z ustawieniami. Po lewej stronie wyróżnione tło widoczne w oknie podglądu opisane Stage 2 backdrops. Poniżej New backdrop. Poniżej ikony: nowe tło, edycja tła, pobranie tła z zewnętrznego pliku, podgląd tła. Na środku okna ustawień od góry napis Sprits, po prawej napis New sprite oraz ikony nowy duszek, edycja, pobranie z zewnętrznego pliku, podgląd. Poniżej wyróżniony obrazek duszka (kotka) opisany Sprite 1. Po prawej okno edycji zajmujące ponad połowę ekranu. Po lewej stronie okna edycji znajdują się zakładki Scripts (wyróżniona), Costiumes, Sounds. Widoczne są działy w zakładce Scripts: Motion, Looks, Sound, Pen, Data, Events, Control, Sensing, Operators, More Blocks (wyróżniony). Każdy dział wyróżniony jest innym kolorem. Pod nimi bloczki do budowania algorytmów z działu More Blocks: Make a block; 10 steps (wyróżniony); Add an Extension. W oknie edycji przedstawione są trzy skrypty. Jeden z nich umożliwia przemieszczanie się duszka po przejściu dla pieszych, a drugi przedstawia zdefiniowany przez użytkownika nowy blok. Trzeci to wynik połączenia dwóch pierwszych skryptów. Pierwszy skrypt, bloczki od góry: when 'zielona flaga' clicked; show; go to x: minus 150, y: minus 150; point in direction 90; turn 40 degrees; repeat 25; move 10 steps; next costume; wait 0,2 secs; end repeat; point in direction 90; repeat 25; move 10 steps; next costume; wait 0,2 secs; end repeat; hide; stop this script. Drugi skrypt, bloczki od góry: define 10 steps; turn 40 degrees; repeat 25; move 10 steps; next costume; wait 0,2 secs; end repeat; point in direction 90; repeat 25; move 10 steps; next costume; wait 0,2 secs; end repeat; hide. Trzeci skrypt, bloczki od góry: when 'zielona flaga' clicked; show; go to x: minus 150, y: minus 150; point in direction 90; 10 steps; stop this script.
The sprite can already pass through the crossing, but it does so incorrectly, without waiting for the green light.
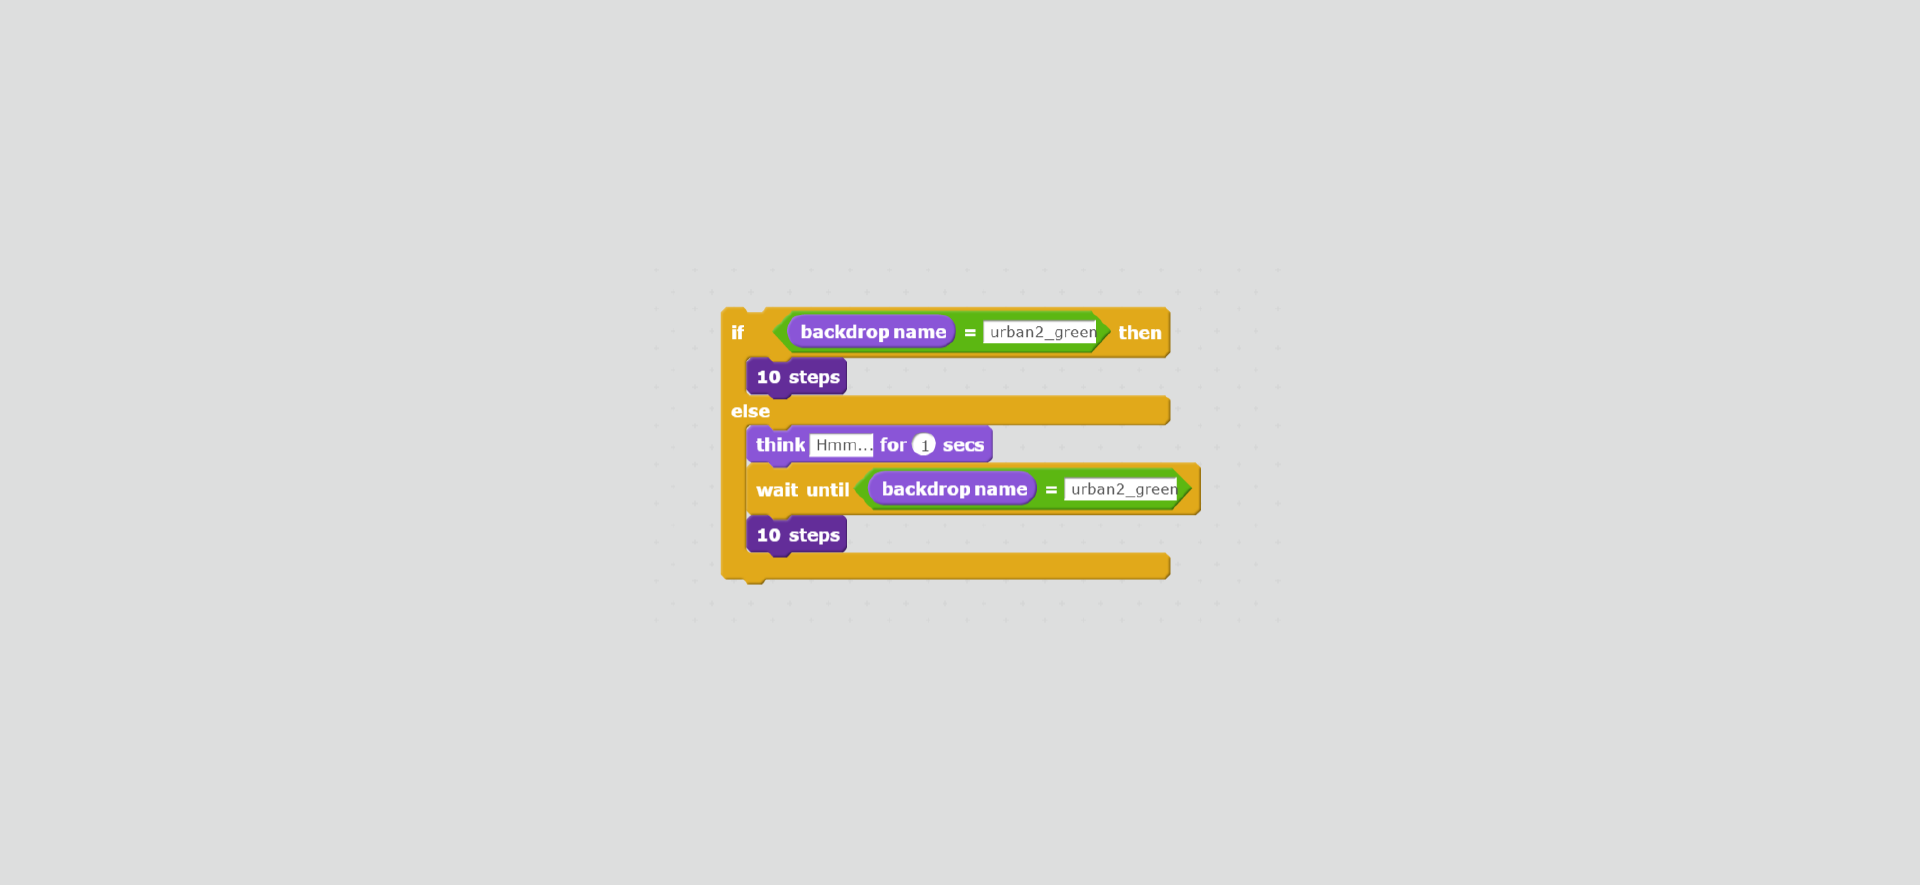
Modify the script in a way that the sprite will cross the road on the green light. When the light is red, the sprite must wait for the light to change.
If we want the sprite to cross the roadroadroad on the green light, and wait on the red light, we can solve it in the way shown in the picture (using the variable previously defined).
R1479yniFxkKF1
Na ilustracji przedstawiony jest zrzut ekranu przedstawiający fragment skryptu zawierający sekwencję poleceń zawierający instrukcję warunkową. Od góry bloczki: if backdrop name equals urban2_green then; 10 steps; else; think Hmm... for 1 secs; wait until backdrop name equals urban2_green; 10 steps; end if.
Source: GroMar, licencja: CC BY 3.0.
Example solution
RJ7lWxnk6bmqd1
Na ilustracji przedstawiony jest skrypt zawierający instrukcję warunkową oraz wcześniej zdefiniowany blok. Od góry bloczki: when 'zielona flaga' clicked; forever; wait 6 secs; switch backdrop to urban2_green; wait 6 secs; switch backdrop to urban2_red; end forever.
A block of conditional instructions is helpful in solving the problem. The commands contained therein will only be executed if the logical condition is true. We build conditions from blocks from the Sensing and Operators category.
R1cJBNzxzkgBh1
Na ilustracji przedstawiony jest bloczek instrukcji warunkowej: If 'puste pole wyboru' than; else; end if.
Conditional instructions are useful in solving various problems. In Scratch you can also define your own variables.
Exercises
RPn50MQ9KogzV
Exercise 1
Wersja alternatywna ćwiczenia: Which sentence is true? Możliwe odpowiedzi: 1. The stage on which the sprite moves is fixed: the width is 280 points and the height is 360 points., 2. In the graphic editor of Scratch, you can modify backdrops from the Backdrops Library., 3. The blocks of conditional statements are in the Control category., 4. The block wait until ... stops the script until it meets the logical condition.
Wersja alternatywna ćwiczenia: Which sentence is true? Możliwe odpowiedzi: 1. The stage on which the sprite moves is fixed: the width is 280 points and the height is 360 points., 2. In the graphic editor of Scratch, you can modify backdrops from the Backdrops Library., 3. The blocks of conditional statements are in the Control category., 4. The block wait until ... stops the script until it meets the logical condition.
Which sentence is true?
The stage on which the sprite moves is fixed: the width is 280 points and the height is 360 points.
In the graphic editor of Scratch, you can modify backdrops from the Backdrops Library.
The blocks of conditional statements are in the Control category.
The block wait until ... stops the script until it meets the logical condition.
Exercise 2
Modify the script in which the sprite crosses the road so that it informs us that it is already on the other side of the pedestrian passage.
Exercise 3
Explain in English how you can define new variables.
Exercise 4
R7K8uYraaELC8
Wersja alternatywna ćwiczenia: Indicate which pairs of expressions or words are translated correctly. Możliwe odpowiedzi: 1. instrukcja warunkowa - conditional statement, 2. współrzędne - coordinates, 3. pozycja - position, 4. sygnalizator - traffic light, 5. plansza - road, 6. ulica - board
Wersja alternatywna ćwiczenia: Indicate which pairs of expressions or words are translated correctly. Możliwe odpowiedzi: 1. instrukcja warunkowa - conditional statement, 2. współrzędne - coordinates, 3. pozycja - position, 4. sygnalizator - traffic light, 5. plansza - road, 6. ulica - board
Indicate which pairs of expressions or words are translated correctly.
instrukcja warunkowa - conditional statement
współrzędne - coordinates
pozycja - position
sygnalizator - traffic light
plansza - road
ulica - board
Source: GroMar, licencja: CC BY 3.0.
R1Pb5JXDqUfuU1
Interaktywna gra, polegająca na łączeniu wyrazów w pary w ciągu jednej minuty. Czas zaczyna upływać wraz z rozpoczęciem gry. Jeden ruch to odkrywanie najpierw jednej potem drugiej karty z wyrazem. Każdy wyraz jest odczytywany. Kolejny ruch to odkrywanie trzeciej i czwartej karty. W ten sposób odsłuchasz wszystkie wyrazy. Nawigacja z poziomu klawiatury za pomocą strzałek, odsłuchiwanie wyrazów enterem lub spacją. Znajdź wszystkie pary wyrazów.
Interaktywna gra, polegająca na łączeniu wyrazów w pary w ciągu jednej minuty. Czas zaczyna upływać wraz z rozpoczęciem gry. Jeden ruch to odkrywanie najpierw jednej potem drugiej karty z wyrazem. Każdy wyraz jest odczytywany. Kolejny ruch to odkrywanie trzeciej i czwartej karty. W ten sposób odsłuchasz wszystkie wyrazy. Nawigacja z poziomu klawiatury za pomocą strzałek, odsłuchiwanie wyrazów enterem lub spacją. Znajdź wszystkie pary wyrazów.
Match Polish terms with their English equivalents.
coordinates
instrukcja warunkowa
pozycja
road
position
ulica
przejście dla pieszych
współrzędne
pedestrian crossing
conditional statement
Source: Zespół autorski Politechniki Łódzkiej, licencja: CC BY 3.0.